What is a Katori Cup Blouse?
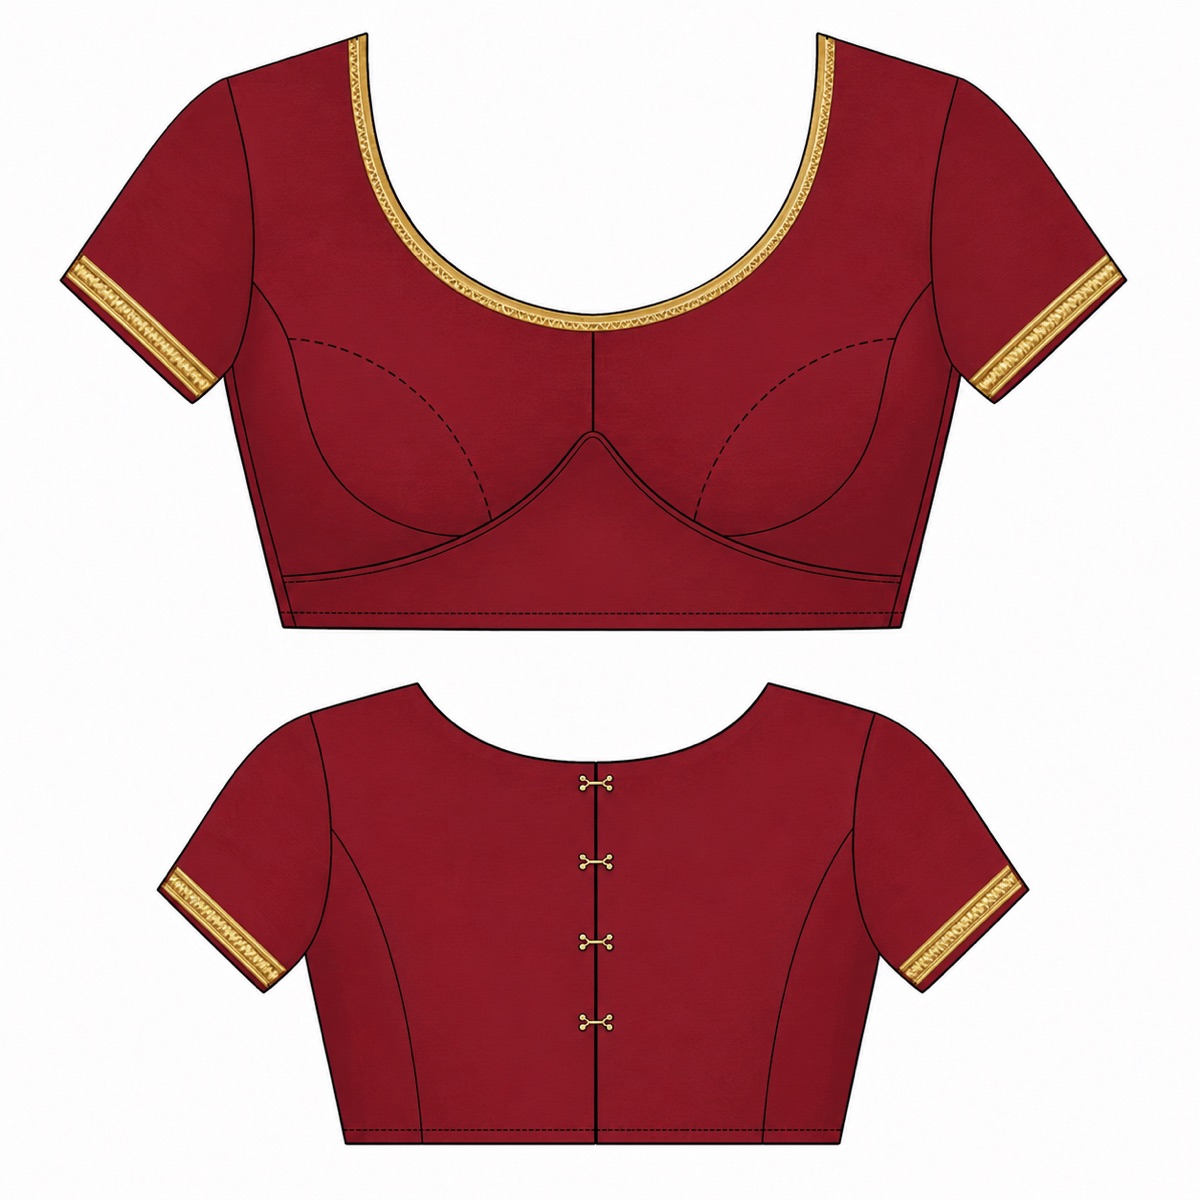
The Katori cup blouse — named after the small bowl (“katori” in Hindi) — is a structured saree blouse where the bust area is shaped using two separately drafted cup pieces. Unlike a flat-cut blouse held in by darts alone, a Katori cup gives a sculpted, three-dimensional bust that follows the body’s natural curve.
A well-drafted Katori cup blouse is the gold standard for bridal wear, designer saree blouses, and any heavy embroidered or maggam-work blouse where the front needs to lie flat without pulling.
Why Tailors Recommend Katori for Heavy Sarees
Kanjivaram, Banarasi, and heavily embellished sarees are stiff. A flat-cut blouse paired with a stiff saree can pull the neckline forward or create gaping at the underarm. The Katori cup eliminates both problems because:
- The cup shape distributes fabric tension evenly around the bust
- The seam under the bust acts as a built-in support line
- Embroidery sits flat on the cup instead of being pulled out of place
- Bust round — the fullest point, tape parallel to floor, snug but not tight.
- Upper chest — just above the bust, under the armpits. This anchors the top of the cup.
- Shoulder-to-apex — from the shoulder seam point straight down to the bust apex (the highest point of the bust). This determines where the cup peak sits.
- Apex-to-apex — horizontal distance between the two bust apexes. This determines cup spacing and dart angle.
- Princess line cup — the seam runs from shoulder to under-bust. Smoothest silhouette, hardest to fit.
- Side-bust cup — the seam runs from the side seam to under-bust. Easier to draft, very common in Tamil and Andhra-style blouses.
- Apex placed too high. The cup sits above the actual bust and creates a pointy, dated 1980s look. Always re-measure shoulder-to-apex on the actual person, not from a size chart.
- Cup spacing too narrow. When apex-to-apex is underestimated, the two cups push together and create a single front “mound.” Add 0.5–1 cm spacing if in doubt.
- Forgetting to true the seam. Both pieces of the cup seam must measure the same length once the curve is drawn. If they don’t, you’ll get puckers.
- Skipping a muslin trial. For bridal blouses, always cut the cup pieces in muslin first. A 30-minute muslin saves a 15,000-rupee blouse.
- Stay-stitch the curved edges of both cup pieces before joining them. Curves stretch on the bias.
- Clip the seam allowance every 1 cm along the curve so it lays flat when pressed.
- Press the seam open over a tailor’s ham (or a tightly rolled towel) — pressing flat will distort the cup.
- For heavy embroidered fabric, underline the cup pieces with cotton lawn before joining. The cup will hold its shape for years.
- Enter your 14 upper-body measurements (bust, upper chest, shoulder-to-apex, apex-to-apex, and the rest).
- Choose Katori cup as your style.
- Download an A3 PDF, print it, tape it together, and you have a full-size pattern ready to cut.
- Princess Cut blouse — cup seam runs all the way to the shoulder for a longer line.
- Padded blouse — same drafting, with foam or fusing inserted between cup and lining.
- High-neck Katori — same cup shape, neckline raised by 1–2 inches.
- Backless Katori — the cup principle holds, but the back closure changes everything about fit; we’ll cover this in a separate guide.
The Four Measurements That Make or Break a Katori Pattern
Most ill-fitting Katori blouses fail because of one of these four numbers:
If any one of these is off by even half an inch, the cup will sit too high, too low, or too wide. Our How to Take Accurate Body Measurements guide covers the exact technique.
Cup Size Reference Table (in inches)
| Bust round | Upper chest | Approx. cup | |------------|-------------|-------------| | 32 | 30 | A | | 34 | 31 | B | | 36 | 32 | C | | 38 | 33 | D | | 40 | 34 | DD | | 42 | 35 | DDD/E |
This is a starting point, not a rule. Indian body shapes vary widely — always trust the measurement, not the cup label.
Step-by-Step: Drafting a Katori Cup Pattern by Hand
Step 1: Draft the basic blouse block
Start with a standard front bodice block based on your bust, waist, shoulder, and front-length measurements. Mark the bust apex on the front piece using your shoulder-to-apex and apex-to-apex measurements.
Step 2: Plan the cup seam line
The cup seam is the curved line that runs from the side seam, under the bust, and up to either the armhole or the shoulder seam. Two common variations:
Draw your chosen line on the front block, passing through (or just below) the apex.
Step 3: Cut and rotate the dart into the seam
Cut along the cup seam line you drew. Rotate the bust dart you would normally place at the side seam into this new seam. The dart “disappears” into the curve, and that curve is what gives the cup its three-dimensional shape.
Step 4: Add seam allowance and curve smoothing
Add 1 cm seam allowance along the cup seam. Smooth the curve so it’s a continuous arc — most fitting issues come from a kink at the seam where two straight lines meet.
Step 5: Mark notches
Mark notches at the apex and at the half-way points on both sides of the seam. These notches are how you align the two pieces during sewing without distorting the curve.
Common Drafting Mistakes
Sewing Tips for Katori Cups
Generate a Katori Pattern in Your Size (Free)
Drafting a Katori cup by hand takes 45–60 minutes once you’re experienced. CuttingMaster’s Pattern Studio does it in under 30 seconds:
No trial and error, no math, no muslin guesswork.
Related Blouse Styles
If you’re drafting Katori, you’ll likely run into these too:
Final Thoughts
The Katori cup blouse looks like an advanced technique, but it’s really just a normal blouse where the bust dart has been moved into a structural seam. Master that one rotation and the whole world of designer blouse cuts — princess line, panel, corset, longline — opens up.
Get the measurements right first. Everything else is geometry.
Ready to draft yours? Open Pattern Studio and have a print-ready Katori pattern in the next two minutes.