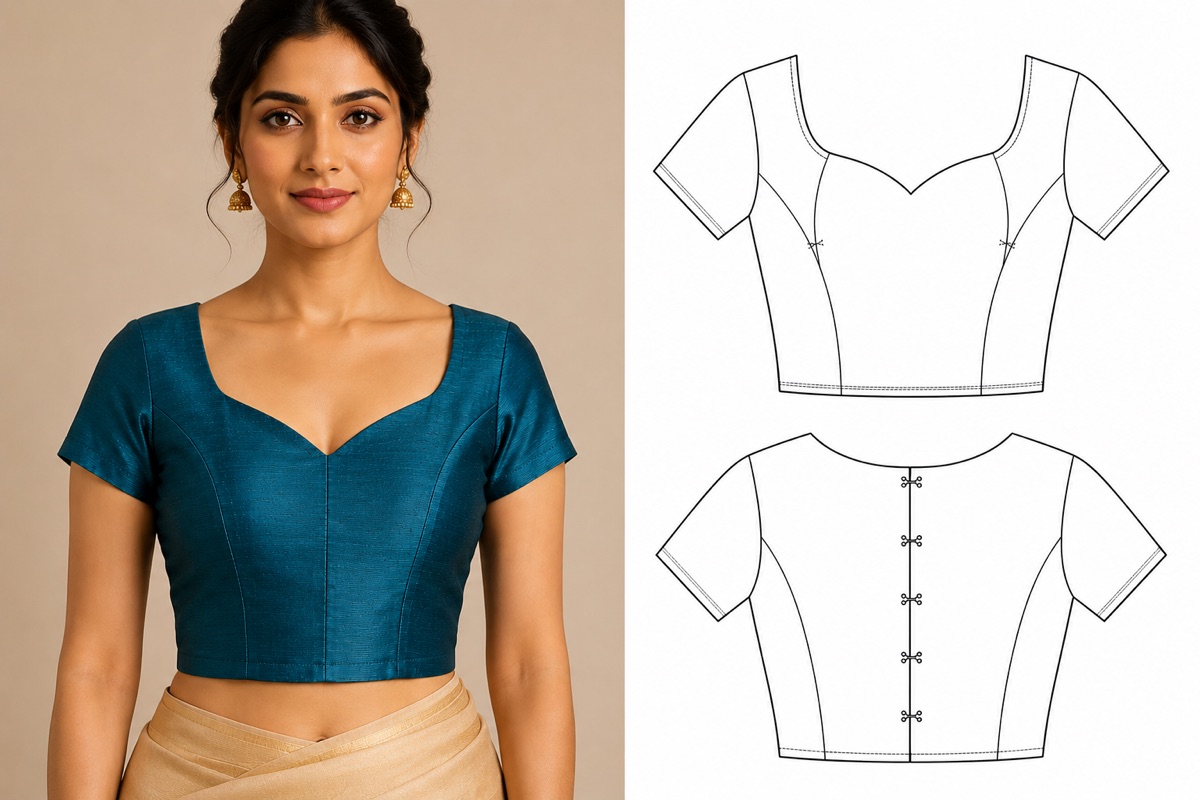
What is a Princess Cut Blouse?
A Princess Cut blouse uses long vertical seams that run from the shoulder (or armhole) all the way down through the bust apex to the hem. There are no visible bust darts — the dart shaping is absorbed into the princess seam, giving the blouse a clean, uninterrupted line from top to bottom.
The Princess Cut is the most flattering silhouette in Indian tailoring because the seams visually elongate the torso, follow the body's natural curve, and let you fit the bust, waist, and ribcage independently.
Princess Cut vs Katori Cup vs Plain Dart
| Style | Seam path | Best for | |-------|-----------|----------| | Plain dart | None visible — single side dart | Simple cotton blouses, daily wear | | Katori cup | Curved seam under the bust only | Bridal, heavy embroidery, structured fit | | Princess cut | Long seam from shoulder to hem | Fitted silhouettes, designer wear, lehenga choli |
If the Katori cup gives sculpting under the bust, the Princess Cut sculpts the whole front and back of the body. Both can be combined for couture pieces.
Two Variations You'll See
1. Shoulder Princess Seam
Seam runs from a point on the shoulder seam, through the bust apex, down to the hem. Most flattering, longest visual line, most demanding on cutting accuracy.
2. Armhole Princess Seam
Seam starts at the armhole curve, runs through the apex, down to the hem. Slightly easier to fit and more forgiving on plus-size figures because the upper part of the bodice stays whole.
Indian designers often combine an armhole princess in the front with a shoulder princess at the back for the longest visual line.
Measurements You Absolutely Need
The Princess Cut is unforgiving — the seam goes right over the bust apex, so an apex marked half an inch off becomes very visible.
If any of these is even slightly wrong, the seam will misalign. Re-read our Body Measurement Guide before drafting.
Step-by-Step: Drafting a Shoulder Princess Cut
Step 1: Start from a fitted bodice block
Draft a standard front bodice block to the bust, waist, and length measurements. Mark the bust apex precisely using shoulder-to-apex and apex-to-apex.
Step 2: Mark the princess line
From the shoulder seam, choose a point about 1/3 of the way in from the neckline. Draw a smooth curve down through the bust apex, dipping in slightly toward the waist (about 2–3 cm narrower at the natural waist), then flaring back out for the hip and continuing to the hem.
The key word is smooth. No sharp angles. Use a French curve.
Step 3: Slash and rotate the bust dart
Cut along your princess line from shoulder to hem. Take the existing bust dart (which lives at the side seam in your basic block) and rotate it into the princess seam. The dart vanishes; the curve carries its shaping.
This is the same technique as Katori, but the dart is rotated into a longer seam instead of a curved one.
Step 4: True the two pieces
Once the slash is done, you have two front pieces: a side-front and a center-front. Walk the princess seam — measure both edges from shoulder to hem. They must be identical in length, or you'll get puckers when sewing.
Small differences (under 0.5 cm) can be eased in. Larger ones mean redrawing the curve.
Step 5: Add seam allowance and notches
- 1 cm seam allowance along the princess seam.
- A notch at the apex.
- A notch 5 cm above and 5 cm below the apex — these are critical for alignment during sewing.
- A waist notch where the seam dips inward.
- Over-curving the waist. A 4 cm dip at the waist looks dramatic on paper but creates a too-tight fit. Stay at 2–3 cm.
- Apex placed too high. Same problem as Katori — measure on the actual person, not from a chart.
- Forgetting to walk the seam. This is the single biggest source of fitting failures in Princess Cut. Do it every time.
- Cutting both sides as one piece. Front-left and front-right of the side-front pieces are mirror images, not identical. Cut them separately.
- Stay-stitch the curved edges of both pieces before joining. Bias stretch ruins princess seams.
- Clip the seam allowance every 1 cm through the curve so it lays flat when pressed.
- Press the seam open over a tailor's ham; the curve won't lay flat on a regular ironing board.
- For heavy fabrics (silk, brocade), under-stitch the seam allowance to the side-front piece. This keeps it from rolling forward.
- Match the apex notches first when pinning. The rest of the seam will fall into place.
- Fitted lehenga cholis — the long seam looks great with a flowy skirt.
- Designer saree blouses — gives the visual length that flat-cut blouses can't.
- Plus-size garments — the four-piece construction lets you fit each section independently, much more flattering than a side-dart blouse.
- Bridal wear with embroidery — embroidery sits cleanly on the larger uninterrupted panels.
- Enter your 14 upper-body measurements.
- Choose Princess Cut as your blouse style (shoulder or armhole variant).
- Download an A3 PDF, print and tape together, and you have a four-piece pattern (left and right front sections, left and right back sections) ready to cut on fabric.
- Katori Cup Blouse Pattern Guide — for sculpted-bust styles
- How to Take Accurate Body Measurements — get the foundation right
- Common Blouse Fitting Problems — diagnose what's gone wrong
- Understanding Dart Placement — the theory behind seam shaping
Step 6: Mirror for the back
Apply the same technique on the back bodice. Most Indian Princess Cut blouses use a slightly straighter back princess seam (less curve at the waist) because the back doesn't have a bust apex to navigate.
Common Drafting Mistakes
Sewing Tips for Princess Seams
When to Use Princess Cut
Avoid for very stiff fabrics like heavy Kanjivaram zari work — those need a Katori cup instead, because a princess seam through stiff fabric creates rigid lines.
Generate a Princess Cut Pattern in Your Size (Free)
Drafting a Princess Cut by hand takes 60–90 minutes plus a muslin fitting. CuttingMaster's Pattern Studio generates one in under 30 seconds:
Related Reading
Final Thoughts
The Princess Cut is the answer when a client asks you for a blouse that "makes them look slimmer" or "feels more designer." It's not a different garment — it's the same blouse with the dart hidden inside a structural seam that runs the full length of the body.
Master the seam-walk and the apex notch, and you'll never sew a flat-cut blouse again.
Ready to draft? Open Pattern Studio and have your Princess Cut pattern in two minutes.